In the world of web design, user experience is paramount. One effective way to enhance usability is through a sticky header. This design feature keeps your navigation bar visible as users scroll down the page, making it easier for them to access important links. If you’re using the Blocksy theme for your WordPress site, creating a sticky header is both simple and effective. In this article, we’ll explore step-by-step tips on how to create a sticky header using the Blocksy theme.
What is a Sticky Header?
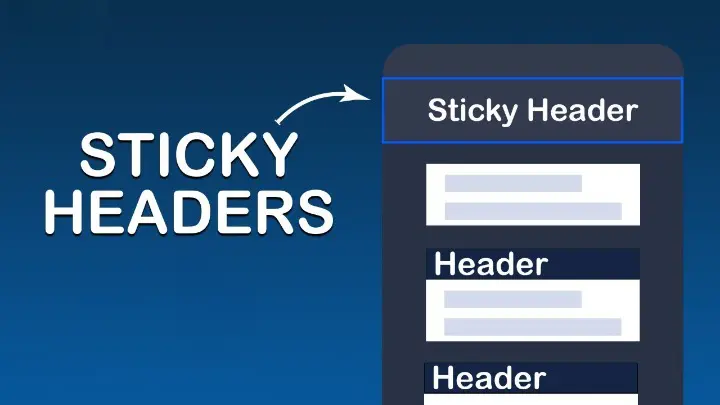
A sticky header (or fixed header) remains at the top of the viewport as users scroll down a webpage. This functionality ensures that your site’s navigation remains accessible, reducing the need to scroll back up to find links. Sticky headers can significantly improve user experience by providing seamless access to essential sections of your website.
Why Use a Sticky Header?
1. Improved Navigation
Sticky headers facilitate easy navigation. Users can quickly jump to different sections of your site without losing their place. This accessibility can lead to lower bounce rates and increased page views.
2. Enhanced Branding
A sticky header helps keep your logo and branding elements visible. This consistent visibility reinforces brand recognition, which is crucial for building trust with your audience.
3. Better User Engagement
When users can easily access links to related content or services, they are more likely to engage with your site. This engagement can lead to longer visit durations and increased conversions.
Setting Up Blocksy Theme
Before creating a sticky header, you need to ensure that the Blocksy theme is installed and activated on your WordPress site. Here’s a quick guide to getting started:
- Install Blocksy: Go to your WordPress dashboard, navigate to Appearance > Themes, and click on Add New. Search for Blocksy, install, and activate it.
- Customize Blocksy: Head to Appearance > Customize to access Blocksy’s customization options. This area allows you to configure various aspects of your theme.
Creating a Sticky Header in Blocksy
Step 1: Access Header Settings
- From your WordPress dashboard, go to Appearance > Customize.
- In the Customizer, look for the Header section. Click on it to access header settings.
Step 2: Enable Sticky Header
- Within the Header settings, you’ll find the option for Sticky Header. Toggle this option to Enable.
- You may also see settings to adjust the sticky header’s behavior. Customize these settings based on your preferences, such as choosing when the header becomes sticky (e.g., after scrolling a certain distance).
Step 3: Adjust Header Appearance
- In the same Header settings section, you can modify the appearance of your sticky header. This includes changing the background color, text color, and font size.
- Ensure that the sticky header stands out enough from the rest of the content, but also remains consistent with your site’s branding.
Step 4: Mobile Responsiveness
Don’t forget to check the mobile responsiveness of your sticky header. Blocksy allows you to customize the header settings specifically for mobile devices:
- In the Customizer, switch to the mobile view by clicking on the mobile icon.
- Adjust the sticky header settings and appearance as needed to ensure that it looks great on smaller screens.
Adding Logo and Navigation to Sticky Header
Step 5: Include Logo
- Still, within the Header settings, locate the option to add your logo.
- Upload a high-quality version of your logo that fits well within the sticky header space.
Step 6: Set Up Navigation Menu
- Under the Header settings, you can add or modify your navigation menu.
- Choose the menu you want to display in your sticky header. Ensure that it includes all essential links for easy access.
Step 7: Menu Alignment and Spacing
- Adjust the alignment of your navigation items (left, center, or right).
- Consider the spacing between menu items to enhance readability and user experience.
Adding Additional Elements to the Sticky Header
Step 8: Include Call-to-Action Buttons
To boost engagement, consider adding call-to-action buttons in your sticky header:
- Use the Customizer to add buttons or additional links.
- Position these elements strategically to draw users’ attention without overcrowding the header.
Step 9: Social Media Icons
Integrating social media icons in your sticky header can encourage users to connect with you on various platforms. Blocksy allows you to add these easily:
- Navigate to the Social Icons section in the Customizer.
- Add links to your social media profiles and customize the icon appearance.
Testing Your Sticky Header
Step 10: Preview and Test
Before finalizing your changes, use the Preview option in the Customizer to see how your sticky header looks and functions:
- Scroll through your site to test the sticky header behavior.
- Ensure that the header remains fixed and that all links and buttons work correctly.
Step 11: Optimize for Performance
A sticky header can impact site performance if not optimized correctly. Here are some tips to ensure smooth functionality:
- Minimize JavaScript: If you’re using additional scripts, ensure they are optimized for performance.
- Lazy Load Images: Use lazy loading for images in your header to improve loading times.

Common Issues with Sticky Headers
Issue 1: Overlapping Content
Sometimes, a sticky header can overlap with content when it becomes fixed. To resolve this, consider:
- Adding padding or margin to the top of your content to ensure it’s not obscured.
- Check the height of your header and adjust the layout accordingly.
Issue 2: Performance Lag
If you notice a lag when scrolling, it might be due to:
- Heavy images or poorly optimized scripts. Use performance testing tools like Google PageSpeed Insights to identify issues.
- Reducing the number of elements in your sticky header can also help.
Enhancing User Experience with Additional Features
Step 12: Animation Effects
Adding subtle animations to your sticky header can enhance user experience. Blocksy allows you to incorporate animations easily:
- Consider using fade or slide effects for a smooth transition when the header becomes sticky.
- Ensure that the animation is not distracting; it should complement the user experience.
Step 13: Change the Header on the Scroll
For an added touch of sophistication, you can change the header’s appearance based on scrolling behavior. This feature is often referred to as a scrolling header. Blocksy supports this functionality:
- In the Header settings, look for options to change the header style when scrolling.
- Experiment with different styles and colors to find what works best for your brand.
Conclusion
Creating a sticky header with the Blocksy theme is a straightforward process that can significantly enhance your website’s usability and design. By following the steps outlined in this article, you can create a functional and aesthetically pleasing sticky header that improves navigation and engages users. Remember to regularly test and optimize your header to ensure it performs well across all devices. With a well-designed sticky header, you’re not just improving user experience—you’re also making a strong statement about your brand. So, take the plunge, implement a sticky header, and watch your website engagement soar!


